At the beginning of 2019, our old PC reached the end of its life. It survived three monitors, two hard drives, three power supplies, and even had 2 GB of DDR2 memory added to its original 6 GB. We also upgraded its graphics card to a Gigabyte GeForce GTX 750 Ti 2GB. However, its aging AMD motherboard with a Pentium Dual Core CPU E5400 2.70 GHz had done its duty. We were quite attached to that PC since it had served us well for over 7 years.
After its demise, we couldn’t afford one of the top-of-the-line machines, so we settled for two lower-performance laptops. Instead of buying the most expensive high-performance computer, we opted for a budget-friendly machine that could handle at least 80% of our computing tasks. We aren’t including the latest games in that percentage. And we can tell you that we’re satisfied with what we managed to purchase.
- Motherboard: AM4 A320, 2x DIMM DDR4 / SATA3 / GLAN / Audio 7.1 / USB 3.0
- Processor: AMD Athlon X4 950, AM4 / 28nm / 4 physical, 4 logical cores / 2MB L2 cache / 65W power consumption
- Processor Clock Speed: 3.5GHz (Turbo frequency 3.8GHz)
- Cooler: AMD stock cooler
- Memory: 8GB DDR4
- SSD: 240GB SATA3 / 2.5
- Hard Disk Capacity: 1TB SATA3 / 3.5 / 7200 RPM
- Graphics Card: nVidia GeForce GT 1030 2GB / GDDR3 / HDMI / DVI-D / VGA / 64-bit
- Sound Card: 7.1 System (integrated on the motherboard)
- Case: Midi Tower Rhino RX459 / 500W power supply
Later, you can add an additional 8 GB of RAM to this machine and replace the graphics card with one that is twice as powerful, featuring 4 GB of memory.
When you buy a new machine, those are the happiest moments for any programmer. You usually think, “Now I’ll clear a spot for it and immediately turn it on, install Windows 10 Pro, and then enjoy installing other programs. I can’t wait to work with a 27-inch monitor.” However, that’s when the challenges begin, and you have to solve them on the fly. First, you might have trouble connecting the monitor to the computer. You’ll likely need an HDMI cable. At the time, we had an extension with an HDMI input, but the new computer required a different HDMI input.
So, you might find yourself returning to the computer store after purchasing the new computer to buy additional items you need. When we first turned on our new computer, we were pleasantly surprised. Instead of the old blue BIOS screen, we encountered a new UEFI interface, usually in a simpler brown color. We believe this depends on the motherboard you have. And then comes that initial moment when MS-DOS opens up, and we need to start installing the best Windows operating system of all time.
How to install Windows 10 Professional on a new computer?
When it comes to the Windows 10 operating system, you don’t need to have the serial number immediately; you can install Windows 10 and activate it later. We have a licensed Windows 10 Pro 64-bit from our old computer. Specifically, we purchased Windows 7 Professional Edition back in 2012, and although it was expensive, we later upgraded it for free to Windows 10 Pro. This has been worthwhile over the years, and my existing serial number is still valid for the current Windows 10 Pro. If you’re buying a computer with a licensed Windows 10, it will likely come pre-installed, but pay attention to whether they provide your Windows 10 license on a DVD with a serial number.
Interestingly, with this computer, UEFI is triggered by
pressing F9. Immediately, UEFI displays a list of drivers and asks which device
to boot from before entering the brown environment. You simply select the name
of your USB Flash drive. But which one? There are two options for the same USB
Flash drive. One of the options has ‘UEFI’ added next to the USB Flash drive’s
name. To determine whether your computer is running the older BIOS or UEFI, you
can check by pressing Windows + R, typing ‘msinfo32,’ and clicking OK.
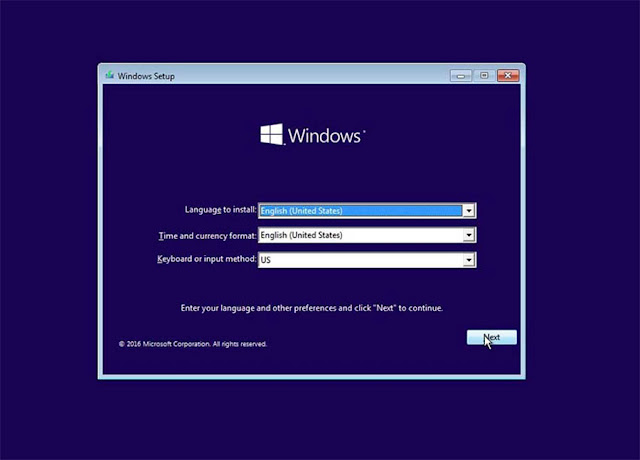
However, you can only do this if Windows 10 is already installed. We mentioned this so you can learn something new. In any case, newer computers use UEFI, which is why we chose the option with ‘UEFI’ in the name of my USB Flash drive, and it worked correctly. If your situation is different, try accessing the BIOS or UEFI using F2, F12, or DEL during startup. Usually, this information appears when you start your computer. Then find the ‘Boot’ section and configure it to boot from your USB Flash drive first. After restarting your computer, you’ll see the blue or purple window for installing the Windows 10 operating system.
In this step, you’re asked to choose the language,
format, and keyboard settings, or you can adjust these later. We pressed the
‘Next’ button, then the ‘Install Now’ button, and a window appeared asking for
the serial number. We entered the serial number, but as we mentioned earlier,
you can bypass this by clicking ‘I don’t have a product key’ and continue the
installation as if you’ve entered the serial number. Keep in mind that during our
installation, our computer was connected to the internet, which might not be
the case for you. If you’re not online, the installation will proceed, but
Windows 10 won’t be activated until you connect to the internet.
Next, in the installation program, we chose ‘Windows 10
Pro’ from the available options, and then it prompted me to accept the terms of
use, which we did. The following window asked us whether we wanted an upgrade
or a custom installation. We selected ‘Custom’ because we were installing a
fresh copy on an empty disk. Another window appeared, asking where we wanted to
install Windows. Considering that our computer has a 240 GB SSD and a 1 TB HDD,
we chose to install Windows 10 Pro on the SSD because it’s faster and better.
In this installation window, you can divide your disks into multiple partitions, format a disk, or delete partitions. We selected the partition where our SSD was located and formatted it, then pressed ‘Next.’ The Windows 10 installation process started, and after a brief period, the computer restarted. We repeated the steps, and the next time we tried to format the partition with the SSD, we received the following error:
Windows cannot be installed to this disk. The selected disk has an MBR partition table. On EFI systems, Windows can only be installed to GPT disks.’"
It seems that your disk is using the MBR partition table, which is not compatible with EFI systems. To resolve this, you’ll need to convert the disk to GPT (GUID Partition Table). You can do this during the installation process or by using third-party tools before attempting the installation again.
We’re never seen anything like this in our life. GPT is better than MBR if you’re using disks larger than 2 GB, but in our case, that’s not the situation. We wondered how to convert MBR to GPT. Some free software tools online claim to do this, but we wouldn’t even consider installing them. Avoid such programs that supposedly offer various tools and protect you from viruses because they can be problematic themselves and take advantage of you when you’re vulnerable.
Navigate to the window where it asks where to install Windows and delete both partitions. Yes, you heard that right - it’s not a hacker’s joke. Delete both partitions, leaving only ‘Drive 0 System Reserved.’ Restart the installation, but this time, when you reach the window where you need to enter the serial number, press SHIFT + F10 to open the console. Type the following commands:
X:\Sources>diskpart
DISKPART>list disk
You should see ‘Disk 0’ listed because that’s where you want to install Windows.
DISKPART>select disk 0
Disk 0 is now the selected disk.
DISKPART>clean
Diskpart succeeded in cleaning the disk.
DISKPART>convert GP
Diskpart successfully converted the selected disk to GPT format.
DISKPART>exit
Leaving DiskPart…
X:\Sources>
Close the window!
Remember to follow these steps carefully, and you should be able to convert your disk from MBR to GPT.
- Enter the serial number again. But this time, you’ll only see ‘Drive 0 Unallocated Space.’ You can create new partitions here, but it’s better to do that after installing Windows 10. Press the ‘Next’ button, and Windows 10 will begin installation.
- Pay close attention when Windows 10 asks you to restart. Before doing so, remove your USB Flash drive, or you’ll start the installation process again. After restarting your computer, you’ll need to configure some settings.
- First, select your region, then choose the English language keyboard layout. Add both the Latin and Cyrillic keyboard layouts for your language. If you’re learning German, you can add that language too. Of course, you can adjust these settings even after completing the Windows 10 installation.
- Next, the installation program will prompt you to connect to the internet if you haven’t already. It will ask for your name and password for logging in when you start your computer. You can also configure privacy settings, including location options. Press ‘Accept,’ and you’re done.
- Keep in mind that the installation process may vary slightly; some installations might require multiple restarts. We’re described our experience from February 15, 2020.
- Now, when you open File Explorer, you’ll see only one disk and partition. Why? Because we deleted the partitions, and after converting MBR to GPT, Windows created a new one. To manage this, right-click the Start button and select ‘Disk Management.’ Click on the ‘Unallocated’ space and create a new partition (e.g., ‘D’) or multiple partitions from the available free space on your disks.
After doing this, check File Explorer again, and you’ll
see the other partitions. However, we encountered sound issues at that point.
Luckily, we had new speakers that worked right away. Similarly, our new
headphones didn’t function immediately, but they miraculously started working
later on. After all these complications and solutions, we truly felt happy, and
we wish the same for you. If you faced a similar problem, we believe you’ve
resolved it thanks to this post.


No comments:
Post a Comment