Despite the fact that you cannot learn CSS3 through one post or even through a whole book because CSS3 is learned through practice and years, you can understand this lesson as an introduction to CSS3 and we will also continue learning it through the following HTML5 & CSS3 tutorial posts. For now, you should remember that using the CSS language - Cascading Style Sheets is one of the basic ways to style and format web pages. CSS makes it possible to separate the design and appearance of a web page from its content and structure, making it easier to maintain and providing more flexibility in customizing the appearance.
- Selectors - CSS uses selectors to identify the HTML elements you want to style. Selectors can be based on element names, classes, IDs, or other element attributes.
- Rules - CSS rules define how selected elements should look. Rules consist of properties, such as color, font, margin, and values assigned to those properties.
- Cascading - the basic feature of CSS is cascading, which means that multiple rules can be applied to the same element, and the final appearance is determined by the specificity of the selector and the order of the rules.
- Box model - CSS defines a box model for each HTML element, which includes margin, padding, border and the content of the element itself. This enables precise management of space and positioning of elements.
- Responsiveness - CSS enables the creation of responsive web design, adaptable to different screen sizes, devices and orientations.
- Pseudo-elements and pseudo-classes - CSS allows styling special states of elements, such as hover, which is an event when the user moves the mouse over the element, or active, which is an event when the user presses the element.
- Classes and IDs – these allow targeting specific groups of elements or individual elements, allowing for precise styling.
- External and Embedded Styles - CSS rules can be defined within the HTML files themselves, in the headers of <style> sections, or they can be kept in external CSS files that link to HTML documents.
- CSS transitions - this is a technique that allows a gradual transition between different styles, e.g. for animations or transitions.
- Flexibility and modularity - CSS allows designers to create different style layers and apply them to different parts of the site, making it easier to maintain and scale.
Essentially, CSS is a key tool for designing and styling web pages so that they look visually appealing and functional. And step by step, you will master the best styling through years of practice.
Creating Styles at the Web Page Level
Styles are applied in a variety of ways to achieve the desired design and appearance of a web page, providing greater flexibility and control over the presentation of content. However, sometimes there is a need to create a minor stylization that should only affect a certain page and not be reflected on other pages within the same website. In such situations, use the <style></style> element in the "head" section of your web page to define this unique style. Regardless of the nature of the changes your styling makes, they will remain isolated and will not affect other pages within your website.
This type of styling is therefore called "web
page-level styling". In practice, it will be much clearer to you. So,
start Visual Studio Code or IDE - Integrated Development Environment, open the
project html_css_tutorial and create a new file lesson7.html. Also, in the same
project, create a new directory and name it images. Then find one of your
favorite images on your computer and transfer one image to your images folder.
In this example we will use a picture of our cocker spaniel and the name of the
picture will be leo1.jpg. Then enter this code in the lesson7.html file. Of
course, change the name of the image to the name of your image that you use in
this project.
<!DOCTYPE
html>
<html
lang="en">
<head>
<meta charset="UTF-8">
<meta name="viewport" content="width=device-width,
initial-scale=1.0">
<title>Creating Page-level Styles</title>
<style>
/* Styling for the whole
page */
body {
font-family: Arial, Helvetica, sans-serif;
background-color: #f0f0f0;
margin: 0;
padding: 0;
}
/* Styling for the title */
h1 {
color: #333;
text-align: center;
padding: 20px;
}
/* Styling for a paragraph
*/
p {
font-size: 18px;
line-height: 1.6;
margin: 0 20px;
}
/* Styling for links */
a {
color: #007bff;
text-decoration: none;
}
/* Styling for the links on
mouseover */
a:hover {
text-decoration: underline;
}
/* Styling for the image */
img {
max-width: 100%;
height: auto;
display: block;
margin: 20px auto;
}
</style>
</head>
<body>
<h1>Creating Page-Level Styles</h1>
<p>
This is an example of an HTML5 document with web page-level styling using CSS.
You can <a href="https://www.manuelradovanovic.com">click here</a> for more information.
</p>
<img src="/images/leo1.jpg" alt="Leo">
</body>
</html>
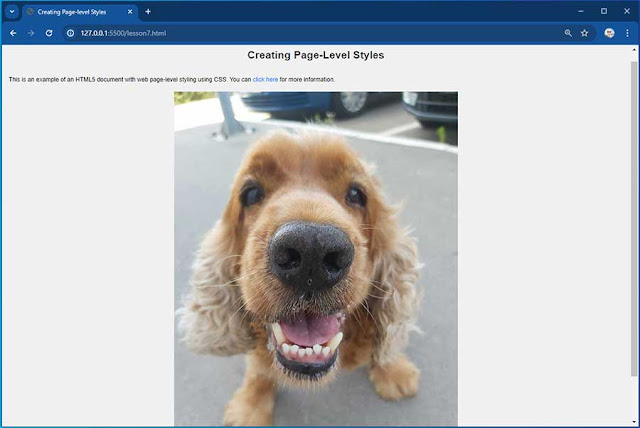
When you run this page on the server, the result will be
similar to the following image, depending on your image in the project.
Creating Styles at the Level of the Entire Website
In contrast to the previous example, there is one good practice when it comes to styling websites, and that is that styling should be done at the level of the entire website, especially if you are working on large projects. This is achieved by placing your styles in a separate file with the *.css extension. Then, instead of including the same styles directly on each individual web page, simply call or link that CSS file to each page you want to apply the styling to. This approach has several advantages.
First, it allows you to centralize styles in one place, which means that any changes or additions you want to make to your page design can be made in just that one CSS file. This makes maintaining and managing styles much easier and more efficient, especially when you have many different pages in a project. Second, this approach can improve the loading speed of web pages because the CSS file is usually cached in the browser's memory after the first load. This means that the same styles will be used on all pages that call that CSS file, instead of reloading the styles each time.
Essentially, centralizing styles in a separate CSS file makes the web development process more efficient, easier to maintain, and improves loading speed. This is especially useful for larger projects where consistency and efficiency are key. Add a new file to our project and call it lesson8.html. Next, enter the following code.
<!DOCTYPE html>
<html lang="en">
<head>
<meta charset="UTF-8">
<meta name="viewport" content="width=device-width,
initial-scale=1.0">
<title>Creating Site-Level Styles</title>
<link rel="stylesheet" href="/css/styles1.css">
</head>
<body>
<header>
<h1>Creating Site-Level Styles</h1>
<nav>
<ul>
<li><a href="#">Home</a></li>
<li><a href="#">Services</a></li>
<li><a href="#">About Us</a></li>
<li><a href="#">Contact</a></li>
</ul>
</nav>
</header>
<section>
<h2>About us</h2>
<p>We are learning HTML5 and
CSS3...</p>
</section>
<section>
<h2>Services</h2>
<ul>
<li>Web Design</li>
<li>SEO Optimization</li>
<li>Responsive
Design</li>
<li>etc...</li>
</ul>
</section>
<footer>
<p>© 2023 Manuel
Radovanovic. All rights reserved.</p>
</footer>
</body>
</html>
Create a new directory in your project and name it css. Then create a new file in it and name it styles1.css. Enter the following CSS code.
/* Resetting styles */
body, h1, h2, h3, p, ul, li {
margin: 0;
padding: 0;
}
/* Styling for the body of
the page */
body {
font-family: Arial, Helvetica, sans-serif;
background-color: #f0f0f0;
}
/* Styling for the header
*/
header {
background-color: #333;
color: white;
padding: 20px;
text-align: center;
}
/* Styling for the
navigation */
nav ul {
list-style: none;
display: flex;
justify-content: center;
margin-top: 10px;
}
nav li {
margin: 0 15px;
}
nav a {
color: white;
text-decoration: none;
}
/* Styling for the sections
*/
section {
padding: 30px;
margin: 20px;
background-color: white;
box-shadow: 0 2px 4px rgba(0, 0, 0.1);
}
/* Styling for the footer
*/
footer {
background-color: #333;
color:white;
text-align: center;
padding: 10px;
}
When you run this page on the server, the result will be as follows.
You can see how it all looks on the video, too.
Efficient Organizing, Selectors in CSS
Selectors are a key tool for properly styling and designing web pages, allowing precise control over the appearance of elements on the page. By combining HTML5 and CSS selectors, web designers can achieve the desired aesthetic appearance and functionality of their web pages. They are the key elements that make it possible to design and style web pages. They play a key role in defining which HTML5 elements should be styled and how they will look. These selectors are usually used in conjunction with CSS to achieve certain stylistic effects. Create a new file in the project and name it lesson9.html. Enter the following code:
<!DOCTYPE html>
<html lang="en">
<head>
<meta charset="UTF-8">
<meta name="viewport" content="width=device-width,
initial-scale=1.0">
<link rel="stylesheet" href="/css/styles2.css">
<title>Selectors in CSS</title>
</head>
<body>
<h1>Selectors in CSS</h1>
<div class="container">
<p>
This is the text inside a div element with the container class.
</p>
</div>
<p>This is a regular paragraph
outside the container.</p>
<h2>A class and an identifier</h2>
<p class="highlight">This is an example of text
with the highlight class.</p>
<p id="special">This is an example of text
with the identifier special</p>
</body>
</html>
In the CSS directory, create a new file and name it styles2.css. Enter the following CSS code:
/* Style for the title */
h1 {
color: blue;
font-size: 24px;
}
/* Style for the class
highlight */
.highlight {
background-color: yellow;
font-weight: bold;
}
/* Style for the container
with class container */
.container {
border: 2px solid gray;
padding: 10px;
}
/* Context selector - style
for <p> inside .container */
.container p {
font-style: italic;
}
/* Context selector - style
for <p> outside .container */
p {
color: green;
}
/* Style for the identifier
special */
#special {
color: green;
font-style: italic;
}
When you run this page on the server, the result will be as follows.
You can see how it all looks on the video, too.
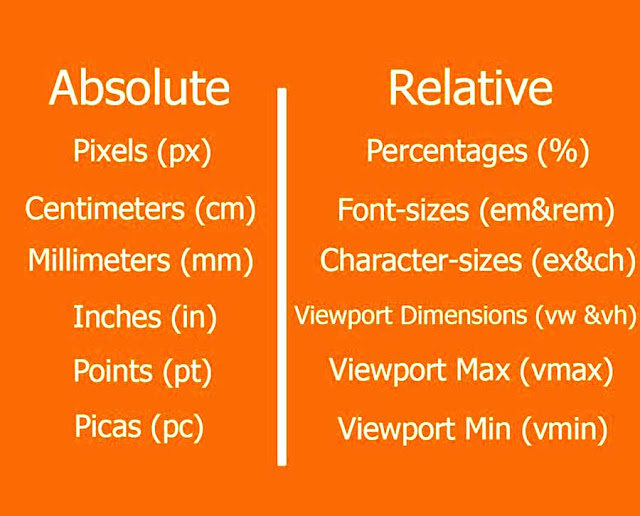
Understanding Units of Measurement in HTML5 and CSS3
In HTML, units of measurement are used to determine the size and position of elements on a web page. With the arrival of HTML5 and CSS3 on the scene; several different units of measurement are introduced that allow a greater level of flexibility and adaptability compared to previous versions of HTML. Units of measurement are often combined to achieve the desired setting of elements on a web page. It is important to note that the correct use of appropriate measurement units is key to achieving the desired design and responsiveness of the website on different devices. See the units of measurement used in HTML5.
<!DOCTYPE html>
<html lang="en">
<head>
<meta charset="UTF-8">
<meta name="viewport" content="width=device-width,
initial-scale=1.0">
<link rel="stylesheet" href="/css/styles3.css">
<title>Measurement units</title>
</head>
<body>
<h1>Measurement units</h1>
<div class="box">
<p>Box with different sizes</p>
</div>
</body>
</html>
In
the CSS directory, create a new file and name it styles3.css. Enter the
following CSS code:
/* Style for the title */
h1 {
color: blue;
}
/* Style for .box */
.box {
width: 200px;
height: 150px;
background-color: yellow;
border: 2px solid red;
margin: 20px;
padding: 10px;
font-size: 16px;
line-height: 1.5;
}
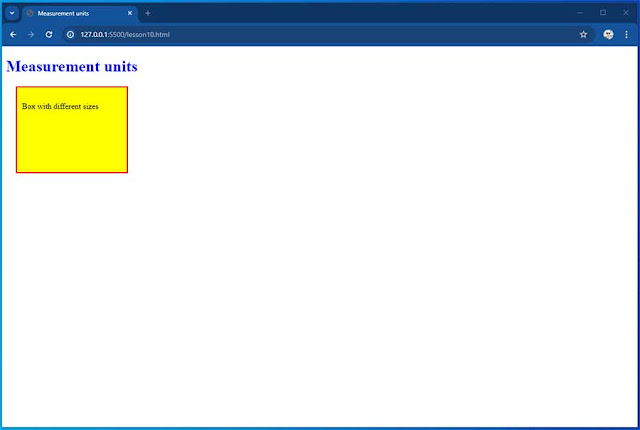
When you run this page on the server, the result will be
as follows.
You can see how it all looks on the video, too.
Colors and Styling, Specifying Colors in CSS
Colors are an essential part of every website. They not only contribute to the aesthetics of the design, but also play a key role in communication with visitors. In CSS, there are several ways to specify the colors to be used for text, backgrounds, borders, and other web page elements. Choosing the right color for your website depends on your goals, branding and aesthetics.
Understanding the different ways to specify colors in CSS gives you more flexibility and control over the appearance of your website. By combining these techniques, you can achieve the desired visual effect and attract the attention of visitors. In the next example, we'll explore some of the basic techniques for specifying colors in CSS. Create a new file in our project and name it lesson11.html. Enter the following code.
<!DOCTYPE html>
<html lang="en">
<head>
<meta charset="UTF-8">
<meta name="viewport" content="width=device-width,
initial-scale=1.0">
<link rel="stylesheet" href="/css/styles4.css">
<title>Specifying colors in CSS</title>
</head>
<body>
<h1>Specifying colors in CSS</h1>
<div class="color-box named">Named colors</div>
<div class="color-box hex">Hexadecimal code</div>
<div class="color-box rgb">RGB values</div>
</body>
</html>
In
the CSS directory, create a new file and name it styles4.css. Enter the
following CSS code:
/* Style for the title */
h1 {
color: blue;
}
/* Style for .color-box */
.color-box {
width: 150px;
height: 150px;
margin: 20px;
padding: 10px;
text-align: center;
font-size: 18px;
line-height: 1.5;
border: 2px solid black
}
/* Named colors */
.named {
background-color: red;
color: white;
}
/* Hexadecimal code */
.hex {
background-color: #00cc66;
color: white;
}
/* RGB values */
.rgb {
background-color: rgb(0, 102, 204);
color: white;
}
When you run this page on the server, the result will be as follows:
Link colors are an important design element on web pages, as they help visitors recognize interactive parts of the content. In CSS, you can precisely control the colors of the links on your website using various CSS properties. Specifying link colors in CSS gives you more control over the appearance of your website and helps visitors better understand the interactive elements. Proper link styling can improve the user experience and add to the aesthetics of your website. Create a new file in our project and name it lesson12.html. Enter the following code.
<!DOCTYPE html>
<html lang="en">
<head>
<meta charset="UTF-8">
<meta name="viewport" content="width=device-width,
initial-scale=1.0">
<link rel="stylesheet" href="/css/styles5.css">
<title>Specifying the color of
links in CSS</title>
</head>
<body>
<h1>Specifying the color of
links in CSS</h1>
<p>This is <a href="https://www.manuelradovanovic.com">a regular link</a></p>
<p class="colored-link">This is <a href="https://www.manuelradovanovic.com">a link with specific color</a></p>
</body>
</html>
In the CSS directory, create a new file and name it styles5.css. Enter the following CSS code:
/* Style for the title */
h1 {
color: blue;
}
/* Style for the links */
a {
text-decoration: none;
transition: color 0.3s; /* Color transition effect
*/
}
/* Style for the links with
a specific color */
.colored-link a {
color: #ff6600;
}
/* Style for the links on hover
*/
a:hover {
color: red;
}
/* Style for the visited
links
a:visited {
color:purple;
}
*/
When you run this page on the server, the result will be as follows.
You can see how it all looks on the video, too.


No comments:
Post a Comment